A friend of mine asked me to create a form on his website so users could submit contracts to him without printing/faxing/attaching to email/etc..... So I said sure. I created a HTML webform and had it emailed to him every time someone clicked submit via a PHP script. Life was happy and he was happy until he started to receive them via plain text and it was unreadable to a non-IT person. So I needed to put it in a more "user friendly" format.
I started with looking for a PHP script that would email a friendlier version with no luck. I found a couple of people that tried but nothing that wasn't super hard to use. It showed very quickly that going down that road wasn't the best. So I decided to put it in a SQL database. His hosting provider gave him 3 databases to use on a shared MySQL server.
I am creating a series of blogs on how I accomplished this task. Stay tuned for more but for now, here is how I wrote the HTML web form.
Preview of the site: http://spinaroundsounddj.com/Contract_Form.html
Part 1
The first step is to create the HTML form. My tasks were to create a "Contracts" webform that looked like his other pages on his site. I had access to his site so the easiest way to start was to get a copy of another page and "Save-As" to a page called Contracts.html. Now that I have a shell of his page (top links, graphics, etc...) I can clean out the middle stuff and add the webform.
Important note to learn now and not later like I did: PHP and MySQL don't do well with CAPTIAL letters. Put everything in lowercase letters - you will be glad you did later.
Start the form with an HTML tag of
<form action="sendresults.php" method="post" name="contractform" id="contractform">
</form>
This will set the form up for you. Out of habit, I always close the HTML tag every time I open one. Just saves you from having to do it later. Let me explain a little about what this command does.
action="nameofphpscript.php" - This is what the submit button will do when it is clicked.
method="post" - You get two options here; POST or GET. very simply, POST puts stuff somewhere and GET gets stuff from somewhere.
name="contractform" - This is the name of the form.
id="contractform" - This is the id of the form
Now you can create all your tables and and inputs remembering to name them with lowercase letters. I set all of my inputs to [type="text"] just to make it easier. Functionality first and make it pretty later!!!
Helpful hint: If I were in your shoes, I would start a list of all the inputs that you make, it will pay off in the PHP script and inserting into SQL part of the blog series.
Now for the all important SUBMIT and RESET buttons. Here is the code:
<input type="submit" name="submit" id="submit" value="submit" />
<input type="reset" name="reset" id="reset" value="reset" />
So that will create (2) buttons on our form. One will submit the form to the ACTION="nameofphpscript" that we defined earlier. The other will clear all fields on the form so the user can start all over. The way they are defined by their function is the value="reset" tag in the code.
Now we should have a webform that looks the way that you want it to. Now we have to do something with it once they click submit. Stay tuned as that is the next part of this blog series.
Wednesday, July 27, 2011
Thursday, July 14, 2011
Enabling Protected Security Groups (domain admins) in Lync 2010
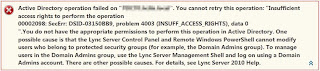
After installing and getting my Lync 2010 server up and running I was ready to enable and add myself to the Lync server. I logged into the Admin Console for Lync and added myself with all the correct options. Then I clicked "Enable" and found this error:
 "Active Directory operation failed on "domain controller
". You cannot retry this operation: "Insufficient access rights to perform the operation"
What do you mean I don't have rights, I'm a Domain Admin for crying out loud!!!! So onto the troubleshooting my rights. I have rights in AD. Lync server can contact the domain no problem. Everything looked to be fine. Then I found that my user account was in a "Protected Security Group" by being a domain admin.
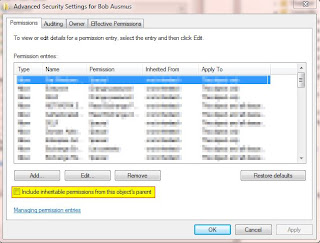
Due to some security features in Active Directory (explained here), when you add or make a change to a user that is in a "Protected Security Group" (i.e. Enterprise or Domain Admins) in Lync 2010, you have to change their security to:
"Include inheritable permissions from this object's parent"
Steps to change this setting:
1. Open Active Directory Users and Computers (ADUC)
2. Change to the domain controller that is close to the Lync server
3. Follow the steps in this article to enable advanced features
4. Open the properties of the user account that you are enabling
5. Click on the "Security" tab
6. Click on "Advanced"
7. Check the box highlighted above
8. "OK" all the way back to ADUC
9. Enable the user in Lync admin console
This will allow you to enable them in the Lync server. This also applies to Exchange and here is a technet article that explains this in more depth.
 "Active Directory operation failed on "domain controller
What do you mean I don't have rights, I'm a Domain Admin for crying out loud!!!! So onto the troubleshooting my rights. I have rights in AD. Lync server can contact the domain no problem. Everything looked to be fine. Then I found that my user account was in a "Protected Security Group" by being a domain admin.
Due to some security features in Active Directory (explained here), when you add or make a change to a user that is in a "Protected Security Group" (i.e. Enterprise or Domain Admins) in Lync 2010, you have to change their security to:
"Include inheritable permissions from this object's parent"

Steps to change this setting:
Wednesday, July 13, 2011
My Road to the CCNA
After years of procrastinating and employers hounding me to get my CCNA (Cisco Certified Networking Associate) certification, I am finally pursuing it. So, I thought that I would blog about my adventure. Hold on, this is going to be a nail-biter….
I have always said that I needed to take the exam once just to see what it was like so I did just that; and failed. I was close and pretty happy with my score a 745 (you need 825 to pass). It did teach me a lot about what I need to prepare for my next sitting on July 9th, 2010. Here are a couple of notes for those of you getting ready to take it:
1. You can’t go back to review and/or change your previous questions answers; only forward. I knew this beforehand but it is always good to mention and remind everyone.
2. I almost ran out of time. It was a 90 minute exam with 50 questions, and I ended with 5:09 minutes left. That isn’t a lot of time per question. I got the multiple choice questions pretty easy but the simulation questions were a killer both time wise and how hard they were. The sim’s took about 15-20 minutes each.
3. Subnetting (shock and awe). You should be extremely proficient in subnetting. I didn’t have a ton of questions on subnetting (like 4) but I already had my cheat sheet written down and I could answer the subnetting questions very quickly saving exam question time, which is the biggest reason for being proficient in subnetting.
4. The “?” command WAS available in all simulations (thank the good lord!!!!) and IIRC the auto-complete was on as well. This was huge in my favor as it helped me on the EIGRP sim.
5. You are on the console of the devices in the sim’s, not the VTY. That means that you will see the messages scroll in the window when things change (i.e. an interface going up or down). This was also helpful on my EIGRP sim as I could see when the neighbor was responding and UP.
6. Don’t forget to apply the access-list to the interface, oops. I know for sure that I got one sim wrong as I forgot to apply it to the interface. Lesson learned.
7. Learn CDP commands. I had one sim that required me to look for which switch updated the VTP domain. Missed that because I didn’t remember “show cdp neighbors detail” command. Also the CDP commands are helpful making sure routers are plugged into the right ports that you are advertising routes on.
All-in-all I was happy with my first showing out of the gate. My study material was a little dated; I took the CCNA class from Sullivan University (link) in 2006 and I have the “old exam” books so I think that I am going to pick up the new book to read this coming weekend. I have lined out a study plan as follows:
- Router Simulator to learn the Cisco IOS commands and how to make them work.
o I like GNS3 for my simulator. Get it here. You will need your own IOS but the simulator is awesome.
o I have worked an EIGRP, OSPF, Access-list, Frame-Relay, RIPv1 and v2 on GNS3 so far.
- Read as much as possible from the new Cisco Press book and www.cisco.com as they seem to have everything you need on their website (funny how that works).- Practice exams (online and through Actual tests). Some people call this cheating, I call it preparing for a tough exam. Just don’t use them to memorize the answers, really try to learn from them (as they do NOTHING for the sim’s and sim’s are a huge part of your exam score).
Adding First and Last names to Active Directory
I know that my first blog being about VB scripting will shock some of you as I am a diehard SharePoint fan, but none the less this was cool. I wrote my first VB script the other day that import over 430 first and last names into Active Directory from a .csv file. It was awesome to see it work after hours or research and testing. I know that most of you are saying, big whoop I do this in my sleep, but for me it was a real eye opener. I hope that this helps someone else in the future. Anyways, here is what I did and what I learned....
I needed a quick way to import 430 first and last names into Active Directory. I knew that DSMOD would be the command that I would use to add them, but how to automate this so I didn’t have to do it by hand? VB Script.
Step #1: I need to declare all the variables in the top of the script. I have been told to put them up here is no necessary, just considered good “coding.” Here are the variables that I declared:
dim swnum
dim swUser
dim swFirst
dim swLast
dim i
Set oShell = CreateObject(“Wscript.shell”)
Set oNet = CreateObject(“Wscript.Network”)
Set oFSO = CreateObject(“Scripting.FileSystemObject”)
f = 500
g = 0
i = 0
Step 1(b): In addition to declaring the variable, we need to define the path to the .csv file. This is how I did it:
BSConfig = “\\ServerUNC\Share\FileName.csv”
Step 1(c): Now that we have defined the configuration file, we have to declare the variable that will call the configuration file. (confused yet?)
BSinfo = oFSO.OpenTextFile(BSConfig,ForReading,True)
Step #2: I need to write a sub-routine that would open the text file and query the .csv columns and push the values to the variables that I could use in the DSMOD command line. Here is the sub-routine:
Sub getinfo()
Do While BSinfo.AtEndOfStream <> True
Line = Bsinfo.ReadLine
LineArray = Split(Line,“,”,-1,1)
i = i + 1 <- This was added to up the count each time to read different lines on the .csv file ->
swnum = LineArray(0) <- The LineArray(0) are the columns in the .csv files ->
swUser = LineArray(1)
swFirst = LineArray(2)
swLast = LineArray(3)
Exit Do
Wscript.sleep “5000”
Loop
If i=500 then <- This will stop the script at the end. Change the 500 to a number after ->
Wscript.exit <- the last row in your .csv file ->
end if
Step #3: I need to write another sub-routine that would execute the DSMOD command. This was the tricky one.
Sub Process ()
Do While g"less than"f
getinfo <- this calls the sub-routine “getinfo” ->
if swUser = “END” then
exit do
end if
oshell.run “cmd /c start dsmod user “”CN=” & swUser & “,OU=Users,DC=Microsoft,DC=com”” –fn “ & swFirst & “ –ln “ & swLast
if g = 500 then
wscript.quit
end if
g = g + 1
Loop
Wscript.sleep “1000”
End Sub
· First, I had to get the EXACT command line with all the right switches for the DSMOD.
· Second, I had to use the “CMD start” line to call the CMD Prompt to execute the DSMOD command. This is the “oshell.run” line.
· Third, I had to insert the variables from the sub-routine “getinfo” into the command line (this is where the rubber meets the road). Look for the variables in the DSMOD command line.
Step #4: I had to call the sub-routine that I wanted to run as the script. This is the part of the whole script that makes it work.
Process <- This will call the sub-routine “Process” ->
Let’s review; I had to declare all my variables (at the top for “good coding”), then I wrote my sub-routines, after that I had the VB script run “process” which kicks off the whole script. Sit back and watch the fireworks. I have posted the entire script in the “Downloads” link below.
This opened a whole new world for me. I am going to attempt to script everything now.
Download
Wednesday, July 6, 2011
Frame-Relay lab (point-to-point)
I know (err hope) that Frame-Relay is on its way out but I hear that there are still some questions about it on the CCNA exam so….. I have to learn it. I found it to be a little easier to configure than I thought.
In reading various blogs and “how-to” guides; everyone is suggesting to use sub-interfaces for Frame-Relay configurations. This is not necessary all the time however it makes it a lot easier to troubleshoot. Here is my network diagram

*Branch S1/0.100 points to DLCI 202 on Port 10 on frame switch
*Edge S1/0.100 points to DLCI 101 on Port 1 on frame switch
I started the configuration by setting up the serial interfaces on the routers to use Frame-Relay (Don’t forget to turn on the interface – a.k.a. “no shutdown”):
Branch#: configure terminal
Branch(config)#: interface serial1/0
Branch(config)#: encapsulation frame-relay
Branch(config)#: no shutdown
Then I move on to creating the sub-interfaces on the routers and assigning an IP address to them:
Branch(config)#: interface serial1/0.100 point-to-point
Branch(config)#: ip address 10.1.1.2 255.255.255.252
Then I need to set the frame-relay settings on the sub-interface (notice the “ietf” on the end of the command, that is the encapsulation type and since I am configuring this on a per-interface basis I need to include it in the command here as oppose to configuring the whole interface to use “ietf.”). Since this is the “Branch” router and it connects to port 10 on the frame switch, I need to configure it with DLCI 202. Change this to 101 for the “Edge” router.
Branch(config)#: frame-relay interface-dcli 202 ietf
That’s it, you’re all done. This is a simple point-to-point configuration. You could also use frame-mapping as well as multi-point configurations (which is really cool).
Links to sites that helped me out:
Cisco: http://www.cisco.com/en/US/docs/ios/12_1/wan/configuration/guide/wcdfrely.html#wp1003004
Tech-recipes: http://www.tech-recipes.com/rx/385/cisco_configure_frame_relay_on_router/
Subscribe to:
Posts (Atom)