Wednesday, September 28, 2011

Clearing DFS Cache

"Server cannot find network path of DFS name space"

Ever ran into that before on a Windows 2008 Server? That is a great error that tells you nothing. Love it. Thanks Microsoft. That great descriptive error from Microsoft means that the cache for the DFS name space is either pointing to the wrong location to is corrupt. Read on to learn how to fix this error....
 
So your cache is brok-ie no work-ie eh? Here is a quick little command that you can run from an elevated (right click and choose run as administrator) command prompt to "flush" the DFS cache on your local server:

dfsutil cache referral flush

So if you run this from your server right now, it will fail and you will be saying - "What happened???" I did like Bob told me to. That's because you haven't installed the tools that you need on the server to support this command. You need to install the "File Services Tools" on the server. Here's how:

Open Server Manager, under Add Feature, Remote Server Administration Tools (RSAT), Role Administration Tools, File Services Tools

Now close and reopen your elevated command prompt and paste the DFS command in again. Now it should work and clear your cache. No reboot needed.

Here is more information
2008 2003

Wednesday, September 14, 2011

My Favorite "8" Keyboard Shortcuts


Have you ever seen that one "IT" guy that seems to be sooooo fast on the computer that you can't seem to follow him or what he is doing? Next time you see that, pay attention to his hands. I bet they rarely leave the keyboard. I made a decision that I was going to learn to use keyboard shortcuts to accomplish my everyday tasks and I swear it made me faster. I decided to share my top 8 favorite keyboard shortcuts with everyone.

1. Windows key

I love that little Windows key down there on either side of the space bar. That key is so useful to do anything. To open "My Computer" all you have to do is press the Windows key + "E" and BAM there it is. Windows Explorer.


2. Control + an arrow key (either right or left)

You know that you can move the cursor from right to left with the arrow keys but, what if you want to scroll all the way through a line of text. What if I could make it so that you could skip back a word at a time as opposed to a letter at a time. I am here to tell you that pressing Control + arrow key will do just that. Your welcome for the extra time you have to take out the trash and fix dinner.


3. Control + C & Control + V   (Copy and Paste)

An oldie but a goodie. I use this shortcut EVERY DAY - ALL DAY long. I rarely type anything out anymore. Copy and paste baby.

     Control + C = copy
     Control + V = paste


4. F5 (refresh)

Learn to love this key. If you are waiting for an ebay action to end, Facebook to update, or can't wait to read Britney Spears latest tweet....press F5. That will cause the web page (and other things as well) to refresh and give you the latest content. Use it every where on the computer, not just a Internet Explorer. Love it!!!!


5. Control + A (select all)

How many of us love to click and drag, then just to mess up and have to do it over? I want to copy everything from this folder to that one. Press control + A and it will select it all for you. Then use hint #3 with hint #7 to perform the copy and paste. You hands will never leave the keyboard and you will be shocked on how fast it was.


6. Select + An arrow key (either right of left)

Selecting or highlighting a line in a document is hard to do with the mouse. You have to click and  hold and drag and not too far....go back...wait it jumped to another line. Next time try this; put your cursor on the letter right before the word or phrase that you want to highlight, then press and hold down SHIFT and an arrow key. That will highlight one letter at a time. Then use hint #3 to copy and paste it.


7. Alt + Tab (Move between windows)

Ok folks...time to get real. This is the best tip that I can give you. If you press alt + tab it will switch from window to window (application to application). Say for example that you have a letter you are typing open in Word and you found this great tag line from a website that you want to put there. Here is how I would do it without moving my hands from the keyboard:

Hint #6 - Hold down SHIFT and press the right arrow key to highlight the text that I want from the site
Hint #3 - Press Control + C to copy it
Hint #7 - Press Alt + Tab to move to the Word document
Hint #3 - Press Control + V to paste it

This hint will change the way that you use the keyboard. I can have numerous windows open at the same time and with this hint, I can flip back and forth between applications, making me look like I am flying around on a computer. Use this one to show your boss that you deserve that raise!!!!


8. F2 

Ever wanted to change the name of a document without having to click...wait....click......crap......to fast now it is opening. Close it...click...wait...wait...click....ok now I can change the file name. What a pain. Now you can use F2 to rename the file. Highlight (or click once) the name of the file, then press F2. That will allow you to rename. This works in Excel as well, editing the contents of a cell.


Just to prove that it can be done for myself, I typed this whole blog without touching the mouse. Now you can shock and amaze your friends at parties.

Wednesday, September 7, 2011

HTML WebForm with PHP and MySQL - Part 4

Part 4 - PHP Script to insert data into database
Link
Recap: Part 1 | Part 2 | Part 3


Now that we have the database and all of the columns created, we now need to get that data into the database. We can do that with a PHP script.

First we need to build a PHP file that we can edit. Create a new file on your webserver and name it whatever you want (I called mine "pushtodb.php"). Now open that file with your editor of choice. I like notepad++ but you can use whatever is more comfortable for you.

Just like in HTML, we have to open the PHP script with <?PHP (and don't forget to close the tag now so you don't forget later - close it with ?>  ). This tells the browser that you are going to use PHP as oppose to just HTML. 


Lets create a variable to open up a connection to the SQL server. You do that with this command:

     $con = mysql_connect("SQL_server_name","username","password");

Now we have to tell the SQL server which database to use. This command will connect to the SQL server and open up the proper database:

     mysql_select_db("database_name", $con);


Notice the "$con" in that statement? That will take the first statement that we wrote and inject it into this one. Trust me, putting things in variables will make your life a LOT easier as you can reuse the variables throughout the script. 

Time to write that SQL statement that we will actually insert values into the database. Let's make this in a variable named "$sql" so we can use it over and over. At this point (if you read Part 1) you should have all your inputs from your webform in a text file so we can input them in the SQL statement. You have them in notepad++ right??? Right??? Here is the SQL statement; copy and paste this into notepad++ so you can edit it as you need to:


     $sql="INSERT INTO table_name (input_1, input_2, input_3)
     VALUES
     ('$_POST[input_1]','$_POST[input_2]','$_POST[input_3]')";

Ok we have all the connections out of the way, now time for use to actually perform the command(s). Here is the code that will take all the variables we defined and put them in a IF statement:
     if (!mysql_query($sql,$con))
     {
     die('Error: ' . mysql_error());
     }
One more piece of code that we will need now but will make more sense later on:
      $id = mysql_insert_id ( );
Whew. Come on Bob aren't we done yet? Nope, we have three more steps to finish. 
1. Assign the URL that we want people to go to after the script has been ran
2. Setup the email that will alert us when something has been submitted
3. close the SQL connection
Task 1:  Assign the URL

Put this in a variable, I used the variable "$url" but you can use whatever helps you remember what it is.

     $url = 'http://www.domain.com/thankyou.html';

The command that will actually take users to the next page is (look for that variable):

     echo '<META HTTP-EQUIV=Refresh CONTENT="0; URL='.$url.'">';


Task 2: Setup the email

You are going to see variables from above in this one. You can see why variables are important.

     $emailadd = 'email@yourdomain.com';
     $subject = 'New contract was submitted';
     $body = "This is the body of the email:";
     $text = $body. " " . $id;

     mail($emailadd, $subject, $text, 'From: '.$emailadd.'');

Pay attention to the bottom line. That is the actual command that will send the email out. As you can see, we are building the email with all the variables we make right above it. See that "$id" variable there. I put that in the email in a future lesson we will use that to lookup this form. We need a place holder that we can call this specific form from the database, and since ID is always unique, its the perfect one to use. 


Task 3: Closing the SQL connection (the easy one)

You are going to find this a real challenge. Here is the code (look for the variable that we assigned earlier):

    mysql_close($con)


At the bottom of the script you should see (if you followed directions from above) the ?> to close the PHP script. 

That's it. Post that to your site and give it a shot. Let me know if it works!!!! Good luck.

Thursday, August 25, 2011

Showing Advanced Features in Active Directory


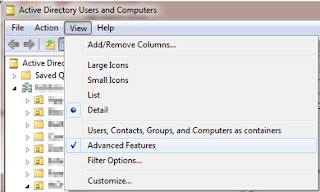
I edit SPN's a lot with MS SQL server and I was sick of using ADSIedit so I found that the ADMINPAK for Windows 7 would allow me to edit the SPN's directly. Only problem is that you can't see the "Attributes" tab in Active Directory Users and Computers (ADUC) without turning on the advanced features. Here is how I turned them on:

1. Open Active Directory Users and Computers (Start -> Run -> type: dsa.msc -> Ok)

2. Click on "View" then check "Advanced Features"


Now you can see the "Attributes" tab as well as a lot of other tabs that make editing user profiles a lot easier for the lonely sys-admin.

Wednesday, August 10, 2011

HTML WebForm with PHP and MySQL - Part 3

Part 3 - Creating the MySQL database
Link
Recap: Part 1 | Part 2

In part 1 & 2 we created a webform that will submit the results to an email address. This is great unless you want it to be readable to non-computer geek people. Also there is no record of the form being submitted except for the email. To accomplish this we need to input the results into a database. I choose MySQL as my hosting provider gave this as part of my package.

Step #1 in putting the form data into a SQL database is to create the database and table where the data will reside. There are a couple of ways to accomplish this however I choose to use the built-in SQL manager. This blog article is not to debate the technology you choose to setup the database, just how to format the columns.

A SQL database is made of tables with columns and rows. A table is like an Excel document with columns and rows. The first thing that we need to do is create a column that will be unique for each row. Most everyone calls this "ID" column. Create this as an integer as well as the following options:

PRIMARY KEY
CANNOT BE NULL (can't be blank)
AUTO INCREMENT (increases by 1 each time something is put in the database)

You can call this row of data to pull data back out of the database. Now to create the rest of the columns.

Remember in Part 1 we defined the input values for each box in the web form. Now we need to create a column for index value. In my form I used "NAME" as the first box that users fill out, which means that I will need to create a column in the database that will receive that data. Create a TEXT column that will receive text form the input box.

Rinse and repeat for every input value you have created in your form. Once you have your table and all the columns defined, you can check your work by running this command:

DESC tablename

That command will show you all the columns in the table and what they are formatted as (i.e. Integer vs TEXT).

In Part 4 we will show you how to put that data in the database with a PHP script that we call from the <form action="SCRIPT.PHP"> that we defined in step #1 in the webform.

Friday, August 5, 2011

HTML WebForm with PHP and MySQL - Part 2

Part 2 - Creating the PHP script (for email)

If you missed it; here is Part 1 - Creating the HTML form

"Prerequisites” – Your webhosting provider / server must support PHP scripts. I use Earthlink and they have a control center where I can enable/disable PHP scripts. Make sure to enable this prior to putting this live in production.

So far we have a HTML webform with the form tag method="post" that will gather the data for us. We also have the form tag action="sendresults.php" which we will use to send us the results to an email account.

NOTE: I can't take credit for this script as I stole it from here: http://forums.htmlhelp.com/index.php?showtopic=7293

Whew……the boring stuff is out of the way, here are the steps to complete this:

Step 1: Download the file from this blog and save on your computer named "sendresults.php"

Step 2: Right click and edit this file in notepad.

Step 3: Change the following lines ($subject / $emailadd / $url)

Step 4: Save the file back to the server.

Let me take a minute to explain the $url. That "$" means that it is a variable and we can name it whatever we want. We can call it $bobisawesome if we wanted to. Basically this is being made we can use it later in the script without having to type in the long URL.

Now we can test the form. If you changed the field (variables) I told you to above, then you should be able to click submit on your form and in a few minutes, receive an email. You should also be redirected to another website (the $url variable) after clicking the submit button.

Let me break down some of the script for you. Look for this line close to the bottom:

mail($emailadd, $subject, $text, 'From: '.$emailadd.'');

This is actually the command that will email us the form. You can see I am building the email with the variables that we declared earlier in the script. Next look for this line:

echo '<META HTTP-EQUIV=Refresh CONTENT="0; URL='.$url.'">';

The ECHO command is the one that we will use to perform the next step (which in our case is to redirect to another page). If you look close at the end of the “ECHO” command, you will see our “$url” variable – yeah!!! The ECHO command can also be used to return something like: 1 row of data updated (which you will see more in the SQL part)

Troubleshooting:

  • If you are redirected to a blank screen with the name of the PHP script in the address; that means that your script blew up. They don’t produce error codes due to security issues. Just know that you didn’t set something in the script properly.
  • Make sure that your email is not sitting in your junk email folder
  • Confirm that PHP scripts are enabled on your web server / hosting provider.
I have enclosed a copy of the PHP script on this blog. Stay tuned for our next part of the series: Part 3 – Putting the data into a SQL database. I know…..I can hardly wait myself.

Wednesday, July 27, 2011

HTML WebForm with PHP and MySQL - Part 1

A friend of mine asked me to create a form on his website so users could submit contracts to him without printing/faxing/attaching to email/etc..... So I said sure. I created a HTML webform and had it emailed to him every time someone clicked submit via a PHP script. Life was happy and he was happy until he started to receive them via plain text and it was unreadable to a non-IT person. So I needed to put it in a more "user friendly" format.

I started with looking for a PHP script that would email a friendlier version with no luck. I found a couple of people that tried but nothing that wasn't super hard to use. It showed very quickly that going down that road wasn't the best. So I decided to put it in a SQL database. His hosting provider gave him 3 databases to use on a shared MySQL server.

I am creating a series of blogs on how I accomplished this task. Stay tuned for more but for now, here is how I wrote the HTML web form.

Preview of the site: http://spinaroundsounddj.com/Contract_Form.html


Part 1

The first step is to create the HTML form. My tasks were to create a "Contracts" webform that looked like his other pages on his site. I had access to his site so the easiest way to start was to get a copy of another page and "Save-As" to a page called Contracts.html. Now that I have a shell of his page (top links, graphics, etc...) I can clean out the middle stuff and add the webform.

Important note to learn now and not later like I did: PHP and MySQL don't do well with CAPTIAL letters. Put everything in lowercase letters - you will be glad you did later.

Start the form with an HTML tag of

<form action="sendresults.php" method="post" name="contractform" id="contractform">
</form>


This will set the form up for you. Out of habit, I always close the HTML tag every time I open one. Just saves you from having to do it later. Let me explain a little about what this command does.

action="nameofphpscript.php" - This is what the submit button will do when it is clicked.
method="post" - You get two options here; POST or GET. very simply, POST puts stuff somewhere and GET gets stuff from somewhere.
name="contractform" - This is the name of the form.
id="contractform" - This is the id of the form

Now you can create all your tables and and inputs remembering to name them with lowercase letters. I set all of my inputs to [type="text"] just to make it easier. Functionality first and make it pretty later!!!

Helpful hint: If I were in your shoes, I would start a list of all the inputs that you make, it will pay off in the PHP script and inserting into SQL part of the blog series.

Now for the all important SUBMIT and RESET buttons. Here is the code:

<input type="submit" name="submit" id="submit" value="submit" />
<input type="reset" name="reset" id="reset" value="reset" />


So that will create (2) buttons on our form. One will submit the form to the ACTION="nameofphpscript" that we defined earlier. The other will clear all fields on the form so the user can start all over. The way they are defined by their function is the value="reset" tag in the code.

Now we should have a webform that looks the way that you want it to. Now we have to do something with it once they click submit. Stay tuned as that is the next part of this blog series.