Thursday, August 25, 2011

Showing Advanced Features in Active Directory


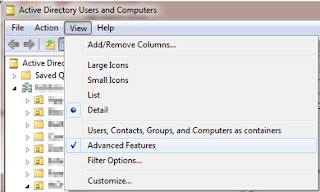
I edit SPN's a lot with MS SQL server and I was sick of using ADSIedit so I found that the ADMINPAK for Windows 7 would allow me to edit the SPN's directly. Only problem is that you can't see the "Attributes" tab in Active Directory Users and Computers (ADUC) without turning on the advanced features. Here is how I turned them on:

1. Open Active Directory Users and Computers (Start -> Run -> type: dsa.msc -> Ok)

2. Click on "View" then check "Advanced Features"


Now you can see the "Attributes" tab as well as a lot of other tabs that make editing user profiles a lot easier for the lonely sys-admin.

Wednesday, August 10, 2011

HTML WebForm with PHP and MySQL - Part 3

Part 3 - Creating the MySQL database
Link
Recap: Part 1 | Part 2

In part 1 & 2 we created a webform that will submit the results to an email address. This is great unless you want it to be readable to non-computer geek people. Also there is no record of the form being submitted except for the email. To accomplish this we need to input the results into a database. I choose MySQL as my hosting provider gave this as part of my package.

Step #1 in putting the form data into a SQL database is to create the database and table where the data will reside. There are a couple of ways to accomplish this however I choose to use the built-in SQL manager. This blog article is not to debate the technology you choose to setup the database, just how to format the columns.

A SQL database is made of tables with columns and rows. A table is like an Excel document with columns and rows. The first thing that we need to do is create a column that will be unique for each row. Most everyone calls this "ID" column. Create this as an integer as well as the following options:

PRIMARY KEY
CANNOT BE NULL (can't be blank)
AUTO INCREMENT (increases by 1 each time something is put in the database)

You can call this row of data to pull data back out of the database. Now to create the rest of the columns.

Remember in Part 1 we defined the input values for each box in the web form. Now we need to create a column for index value. In my form I used "NAME" as the first box that users fill out, which means that I will need to create a column in the database that will receive that data. Create a TEXT column that will receive text form the input box.

Rinse and repeat for every input value you have created in your form. Once you have your table and all the columns defined, you can check your work by running this command:

DESC tablename

That command will show you all the columns in the table and what they are formatted as (i.e. Integer vs TEXT).

In Part 4 we will show you how to put that data in the database with a PHP script that we call from the <form action="SCRIPT.PHP"> that we defined in step #1 in the webform.

Friday, August 5, 2011

HTML WebForm with PHP and MySQL - Part 2

Part 2 - Creating the PHP script (for email)

If you missed it; here is Part 1 - Creating the HTML form

"Prerequisites” – Your webhosting provider / server must support PHP scripts. I use Earthlink and they have a control center where I can enable/disable PHP scripts. Make sure to enable this prior to putting this live in production.

So far we have a HTML webform with the form tag method="post" that will gather the data for us. We also have the form tag action="sendresults.php" which we will use to send us the results to an email account.

NOTE: I can't take credit for this script as I stole it from here: http://forums.htmlhelp.com/index.php?showtopic=7293

Whew……the boring stuff is out of the way, here are the steps to complete this:

Step 1: Download the file from this blog and save on your computer named "sendresults.php"

Step 2: Right click and edit this file in notepad.

Step 3: Change the following lines ($subject / $emailadd / $url)

Step 4: Save the file back to the server.

Let me take a minute to explain the $url. That "$" means that it is a variable and we can name it whatever we want. We can call it $bobisawesome if we wanted to. Basically this is being made we can use it later in the script without having to type in the long URL.

Now we can test the form. If you changed the field (variables) I told you to above, then you should be able to click submit on your form and in a few minutes, receive an email. You should also be redirected to another website (the $url variable) after clicking the submit button.

Let me break down some of the script for you. Look for this line close to the bottom:

mail($emailadd, $subject, $text, 'From: '.$emailadd.'');

This is actually the command that will email us the form. You can see I am building the email with the variables that we declared earlier in the script. Next look for this line:

echo '<META HTTP-EQUIV=Refresh CONTENT="0; URL='.$url.'">';

The ECHO command is the one that we will use to perform the next step (which in our case is to redirect to another page). If you look close at the end of the “ECHO” command, you will see our “$url” variable – yeah!!! The ECHO command can also be used to return something like: 1 row of data updated (which you will see more in the SQL part)

Troubleshooting:

  • If you are redirected to a blank screen with the name of the PHP script in the address; that means that your script blew up. They don’t produce error codes due to security issues. Just know that you didn’t set something in the script properly.
  • Make sure that your email is not sitting in your junk email folder
  • Confirm that PHP scripts are enabled on your web server / hosting provider.
I have enclosed a copy of the PHP script on this blog. Stay tuned for our next part of the series: Part 3 – Putting the data into a SQL database. I know…..I can hardly wait myself.